How To Lay Block Paving
A step by step guide on how to lay block paving on your driveway and which block paving tools and safety equipment you will require
NOTE:
Photos from 3 different jobs are used to show the close up detail of each stage
Reproduction of this site in whole or in part is strictly prohibited
The materials on this website may be retrieved and downloaded solely for personal use. No materials may otherwise be copied, modified, published, broadcast or otherwise distributed without the prior written permission from Crystalclear
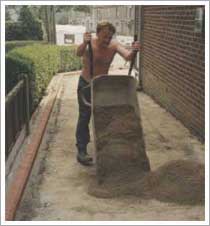
Stage 7: Course grit sand
Coarse or grit sand to bed the block paving on
35mm - 40mm deep of course grit sand is laid to the entire area approx. 15mm - 20mm higher than the finished height to allow for compacting. Different parts of the country have different grades of sand and as a rule of thumb get the coarse grit sand rather than a fine grain sand.
Do not use building sand as it is too soft a type of sand plus when it gets wet it turns into a slurry, over a period in time the sand laying coarse will start to wash away underneath the block paved driveway and the block paving will start to loose its flat appearance and start to hold water in the low area
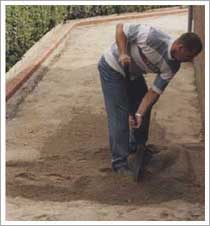
Stage 7: Level the grit sand
level the course sand
Using a spade in a swinging motion you need to level the sand roughly to the correct height
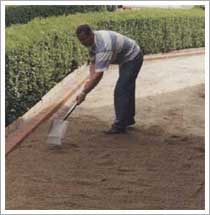
Stage 7: Cover the total area
cover all the hardcore with course sand
And continue over the total area until you have covered all the hardcore
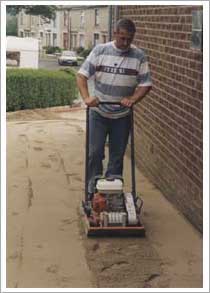
Stage 8: Compact grit sand
compact the grit sand
Once you have covered the entire area with sand this needs to be compacted with your vibrating plate, you will see the lines and your footprints going less and less after going over your sand 2 - 3 times. Continue until you don't leave any marks on the sand when you walk over it.
It’s advisable to have your sand harder and higher than to leave any low soft spots
Note:
There are two methods you can use as the bed for block paving, one is where you have fully compacted sand like I describe making the sub base and the laying coarse much firmer so you can achieve a much flatter surface and no chance of the paving dipping into any low spots when compacted with the vibrating plate once the paving is laid, to achieve this you need your sand approx 10 – 15mm higher than the finished screeding height, this surplus sand is screeded off to the correct height and then you lay your block paving.
The other way is to have 2 thirds compacted sand and a third loose sand which you screed to the desired height, this is easier to screed as the sand is loose and not compacted but can result in soft spots which the paving will compact into resulting in possible low areas which could hold water
We always use the fully compacted method as the tolerance on block paving manufactured by Marshalls Bradstone and Plaspave is 1 -2 mm per block so there is not the same requirement to bed down the difference of the depth of the blocks as the vibrating plate will compact 2mm quite easily
Stage 9: The finished height
checking the finished height of the block pave driveway
To get the finished height of your block paving we use a block as a guide and push it back and forwards and down into the sand until it is 5mm higher than the finished height to allow for the final compacting once all the block paving is in place
The finished level of block paving should be 150mm below the house D.P.C. Level
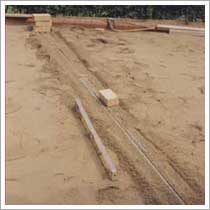
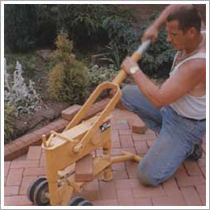
Stage 10: Steel Screeding Rails
using steel poles as a guide to screed the sand
To get a perfectly flat bed for your pavers to lay on you can use 18mm galvanised steel electrical conduit, the type that are used by electricians for putting cables through, they are not expensive but are better than using timber because the piece of timber or aluminum you use to screed the sand will slide along them much easier
Using a tight string line to get the screeding rails to the correct finished height prior to screeding the sand, they are checked for being level or falling towards any drains, 1:60 fall is required, that's 1" in height to 60" in length minimum fall to ensure any surface water disburses into your drainage system or soak a way
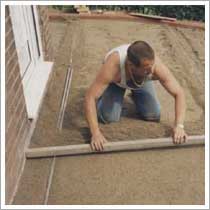
Stage 11: Screeding the sand
screed the course sand prior to laying the block paving
Once the screeding rails are in place we begin to screed the sand to the correct height prior to laying your blocks. When the screeding is finished we remove the steel screeding rails and fill this gap with grit sand sand using a steel trowel to give a smooth flat finish
Do not leave the steel screeding rails in the sand, they must be removed and the gap filled in with sand
Note:
you don't have to use screeding rail they are used just for speed of screeding and to make sure you have the correct levels and fall, instead you can free hand screed but the finish will not be the same unless your experienced at this particular trade
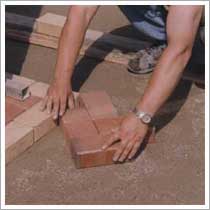
Stage 12: Laying the block paving
laying the block pave driveway
The next stage is to commence laying the block paving, the full blocks are laid first to a straight line either using a string line or an aluminum straight edge and then continue laying the blocks until the total area of your drive is completed.
The block can be laid either square to the house or on a 45 degree angle. On this drive the full blocks started at the front corner of the house working towards the boundary edge restraint. It was done this way so full blocks showed all round the house and any cuts were only visible at the garden side of the drive
Note:
To ensure an even distribution of colour and texture mix and lay blocks from at least 3 packs of block paving
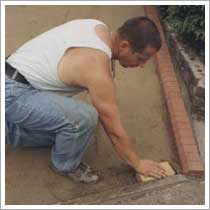
Stage 13: Cut blocks
cut in the edges of your new driveway
When you have completed the laying of your full blocks you need to cut in the edges, this can be completed either using a 2 stroke brick saw with a diamond blade or a block splitter.
These can be hired from your local hire shop. Using a straight edge or string line mark the width of the border using a block as a guide and mark a line onto the full block, cut off the surplus and put the cut block in its place. Continue cutting the block paving pieces until all the cuts are completed
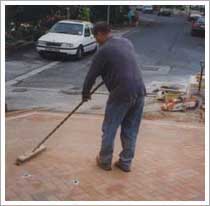
Stage 14: Kiln Dried Sand
brush kiln dried sand in the joints of the block paving
When all the cut blocks are in place brush all of the driveway to remove any broken pieces of block or dust to ensure they don't get down the joints between the block paving.
Brush kiln dried sand over the entire area making sure all the joints are full to the top prior to giving them the final compacting with the plate vibrator, you can leave surplus sand on top of the the block paving driveway so when the vibrating plate passes over it will spread it about filling any joint which may require more sand
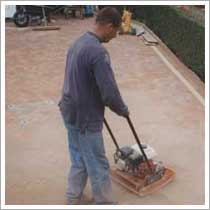
Stage 15: Final Compacting
final compacting with the vibrating plate
The vibrating plate is run over the total area 2 to 3 times to ensure the blocks are fully bedded into place and any surplus kiln dried sand is now removed
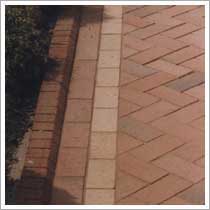
Block Pave border
Block Pave Border
The Block Paving driveway is now completed and ready for you to use.
Note:
Some block paving contractors insist on the customers not driving on the new block paving for a few days after the job has been completed, trust me if you have followed these steps you can drive on your new block paving driveway as soon as you have compacted the kiln dried sand in-between the blocks, the joints are full and any surplus kiln dried sand is removed
You may have to add more sand a few weeks later to keep all the joints in the paving topped up
You must keep your new block paving driveway maintained at least once a year by:-
Keeping on top of weeds and moss
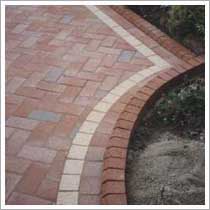
Curved Border
curved border to the new block pave driveway
Curved block paving border with edging detail To achieve this curve cut the 200mm x 100mm blocks in half making them 100mm x 100mm, then they will bend to your required curve without leaving a large tapering gap between each block.
If you want a tight curve then you will have to taper both sides of the blocks to achieve a neat finish otherwise you will have lots of sand in the joints