How To Lay Block Paving
A step by step guide on how to lay block paving on your driveway and which block paving tools and safety equipment you will require
NOTE:
Photos from 3 different jobs are used to show the close up detail of each stage
Reproduction of this site in whole or in part is strictly prohibited
The materials on this website may be retrieved and downloaded solely for personal use. No materials may otherwise be copied, modified, published, broadcast or otherwise distributed without the prior written permission from Crystalclear
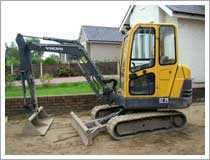
Stage 1: Remove the existing driveway
The first stage is to remove your existing driveway, this could be either concrete, tarmac or concrete flags. The use of a mini digger which can be hired from most plant hire companies in your area, makes this easier and is normally completed within one day with all the debris placed into a skip and taken away. If you don't feel confident driving a mini digger then get someone to do this for you as removing the existing driveway by hand digging will take much longer to do
The minimum depth you need to remove from the top of your existing driveway is 250mm (10") to allow for 150mm (6") of hardcore, 50mm (2") of sand and 50mm (2") for your block paving. 250mm overall is the minimum depth of ground what needs removing, if the ground is soft under your driveway you will need to remove more earth or clay and replace with additional hardcore which needs to be compacted in layers of no more than 75mm - 100mm at a time
The angle of the new block paving driveway needs to be a minimum of 1:60 fall, that 1” fall in 60” length (25mm fall in 1500mm), assuming you have a 3’ level it will be approx half an inch fall in the length of your level
Knock 2 timber pegs or steel pins into the ground one at the house side of the driveway and the other at the pavement side and attach a tight builder’s nylon line at what is going to be the finished height of your block paving, this line will be approx 5mm higher than the pavement and 150mm lower than the damp proof course to allow for final compaction of the block paving
If the driveway is falling away from the house then hold your level on this line at the house side and move it up and down until it is level, if you have a gap under the level on the side facing the pavement then you have already got fall in the driveway. You can use an off cut of wood or something similar what is half an inch thick to check the depth of the fall in the line away from the house
When you are satisfied with the height and fall of the line if you wrap some masking tape or insulation tape round the pegs to the underside of your line it will save having to go through the same process again if the line is taken off for any reason
Make sure that your line is quite tight as you don’t want to have any sag in your line, this will give you a false reading with your levels which could result in your finished driveway holding water, if your driveway has more than half an inch fall in the length of your level then this is even better
Note:
If your driveway is falling towards the house then you simply reverse the fall and levels from the pavement towards an existing rain water gully or you might have to install drainage channels along the front of the property to catch the surface water which is then directed into a soak a way within your garden area, a soak a way or rain garden is now required in England to comply with the block paving planning permission what came into force October 1st 2008
Do not build rain gardens or soakaways close to building foundations. For small driveways a minimum distance of 3m should be suitable but it depends on the ground conditions and a greater distance may be required, if you are unsure ask your local authority Building Control Department
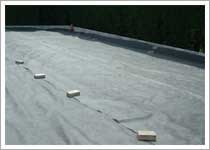
Stage 2: Geotextile Membrane
geotextile layer under the hardcore
When you have removed the existing driveway and all of the debris the next stage is to place a geotextile layer on top of the subsoil to the total area of your driveway which helps prevent the intermixing of the sub soil or clay and the hardcore yet still permits water to flow freely.
This need to be held in place with a few bricks or blocks so the wind does not disturb it, try to keep it as flat and as tight as you can whilst you begin to place the hardcore on top of this geotextile membrane
This is available from your local Builders Merchants and is called many names including terram, geotextile membrane, weed control fabric or weed control membrane
Stage 3: Compact the hardcore
Bomag 10 ton vibrating roller
MOT type 1 hard core is laid to the total area of your new driveway on top of the geotextile membrane to a minimum depth of 150mm, your hardcore now needs to be compacted to give a stable sub base for your new block paving, this can be achieved with either a vibrating roller or a vibrating plate.
On larger areas or where heavy vehicular access is needed we always use the vibrating roller to ensure the sub base is very well compacted
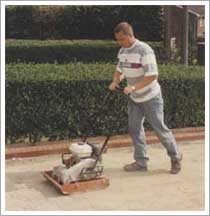
Stage 3: Compact the hardcore
vibrating plate compacting the hardcore
For smaller areas where the large roller can't access a vibrating plate is used to compact the hardcore. The compacting of the hardcore is completed when we are satisfied that the sub base of your new drive is firm and has no soft spots. If any area is still soft it needs to be dug out and removed and replaced with more hardcore which needs to be compacted in layers of no more than 75mm - 100mm at a time
Stage 4: A firm edge restraint
fixing the edging to hold the block paving in place
Any area of your block paving must be surrounded by a firm edge restraint to prevent the blocks and the sand on which they are laid from creeping sideways, either the house walls, fence base panel or new edgings along any side which require the paving to be held in place.
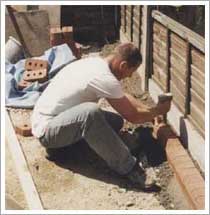
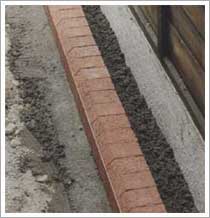
Stage 4: Block paving key kerb edging
edging now finished and held in place with concrete
Using a tight string line to keep the front edge of the edging block in a straight line, the blocks are laid on a semi dry mix of 3 parts grit sand to 1 part cement and hauched front and back to hold in place
Mix the grit sand and cement together before you add any water, then add a little bit of water at a time until the mixture is what's known in the trade as semi dry or tacky, when you squeeze a handful together it stays in a ball and does not fall apart
NOTE:
if you add too much water and the mixture is wet then you will not be able to stop the edgings from falling over as they sink into the bed. The term haunched or haunching is a process used to describe the sand and cement mixture that is placed at the front and rear of the edging and pushed into place using a steel trowel to hold the edging in place
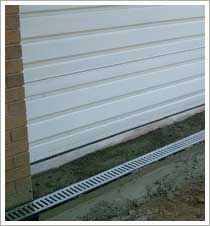
Stage 5: Drainage channels
Bed the drainage channel on concrete and haunch either side to hold in place
Drainage channels are now required in England on any new block paving driveways to direct the surface water into a soakaway or rain garden, these may be across the pavement or garage or to the front of your property
Using a tight string line 5mm below the finished height of your new driveway and a slight fall towards the outlet for the drain, lay a bed of 3:1 mixture of sharp sand and cement and connect the channels together and tap down into the bed making sure the top of the channel is flush with the line. Haunch both side of the channels to hold them in place.
Note:
Make sure the haunching is low enough so the block paving will fit tight up to the drainage channels and still be on a bed of sand, you can check this by using a block or a tape measure as a guide. The reason that the channel is bedded 5mm lower than the finished height of the paving is to allow for compaction of the paving with the vibrating plate when you have completed the laying which will leave the block paving 2mm - 3mm higher than the channel
Stage 6: Fix new man hole cover
The block paving manhole cover is bedded into place using a 3:1 mixture of sand and cement making sure its at the correct height and fall. This can be achieved by using a tight string line from one side of the drive to the other, the line will be at the finished height of your block paving
Place the manhole cover outer frame onto a bed of sand and cement and gently tap into place until it is flush with your string line
Haunch both the inside and outside of the manhole cover outer frame to hold it in position and place the manhole lid in inside the frame
Note:
The manhole lid must be placed inside the outer frame to stop anyone from falling down the manhole or alternatively cover with a board until the concrete bedding has set